HandBrake is an open-source, GPL-licensed, multiplatform, multithreaded video transcoder, available for MacOS X, Linux and Windows.
Supported Sources:
Any DVD-like source: VIDEO_TS folder, DVD image or real DVD (unencrypted--protection methods including CSS are not supported internally and must be handled externally with third-party software and libraries), and some .VOB and .TS files
Most any multimedia file it can get libavformat to read and libavcodec to decode.
Outputs:
File format: MP4 and MKV
Video: MPEG-4, H.264, or Theora
Audio: AAC, CoreAudio AAC (OS X Only), MP3, or Vorbis. AC-3 pass-through, DTS pass-thorugh (MKV only)
Misc features:
Chapter selection
Subtitles
Integrated bitrate calculator
Picture deinterlacing, cropping and scaling
Live Video Preivew
Credits
HandBrake uses a lot of (L)GPL librairies from the Linux world:
Step 1: Adding the below lines to /etc/apt/sources.list
deb http://ppa.launchpad.net/stebbins/handbrake-snapshots/ubuntu lucid main
deb-src http://ppa.launchpad.net/stebbins/handbrake-snapshots/ubuntu lucid main
Step 2: Adding this PPA to your system
You can update your system with unsupported packages from this untrusted PPA by adding ppa:stebbins/handbrake-snapshots to your system's Software Sources.
tatshuya$> sudo add-apt-repository ppa:stebbins/handbrake-snapshots
Step 3: Now, as a one-off, you should tell your system to pull down the latest list of software from each archive it knows about, including the PPA you just added:
tatshuya$> sudo apt-get update
Step 4: Installing handbrake package.
tatshuya$> sudo apt-get install handbrake-gtk
== TaTsHuYa ==
Thursday, May 27, 2010
Wednesday, May 26, 2010
Unison - File Synchronizer Tools
What is Unison?
Unison is a file-synchronization tool for Unix and Windows. It allows
two replicas of a collection of files and directories to be stored on
different hosts (or different disks on the same host), modified
separately, and then brought up to date by propagating the changes in
each replica to the other.
So I used Ubuntu, it easy to install on this distribute.
tatshuya$ sudo apt-get install unison-gtk
Start the program.

First use.

select your directory that you want to synchronize.

select your destination.
Example of result when you sync your data.

==TaTsHuYa==
Monday, May 10, 2010
How to implement SNMP on RedHat's Server
Objective:
Centralize monitoring server at my network use Nagios engine to monitor and alarm when there is a problem in the network, there are many ways to retrieve the information on remote server like use NRPE ( Nagios Addons - allows you to remotely execute Nagios plugins on other Linux/Unix machines but it need to install program on remote host ) or SNMP ( Simple Network Management Protocol – use UDP network protocol )
Package Requirements :
The following is the list of package required for snmpd for Red Hat Enterprise Linux 4 U7
net-snmp
net-snmp-lib
To determine whether the required package is installed, enter commands similar to the following.
# rpm -q net-snmp net-snmp-libs
if the package is not installed on the server, you will see the result like this.
package net-snmp-5.1.2 is not installed ( or )
package net-snmp-libs-5.1.2 is not installed
To install the required package, enter command similar to the following.
# rpm -ivh net-snmp-5.1.2-18.el4.x86_64.rpm net-snmp-libs-5.1.2-18.el4.x86_64.rpm
If you found package net-snmp-5.1.2 is not installed but there is an package net-snmp-libs-5.1.2 installed on server but it is older version than net-snmp-5.1.2-18.el4, when you install net-snmp-5.1.2-18.el4.x86_64.rpm you will found the error like this
warning: /tmp/net-snmp-5.1.2-18.el4.x86_64.rpm: V3 DSA signature: NOKEY, key ID db42a60e
error: Failed dependencies:
net-snmp-libs = 5.1.2-18.el4 is needed by net-snmp-5.1.2-18.el4.x86_64
you should update net-snmp-libs before you install net-snmp by command.
# rpm -Uvh net-snmp-libs-5.1.2-18.el4.x86_64.rpm
Now the lastest package for net-snmp and net-snmp-libs are version 5.1.2-18, you can download from Redhat website at http://rhn.redhat.com
Configure snmpd.conf :
First section, change the community 'public' to use word that we defined in the group and specific the source of ip address or hostname and define the security name that we will use in the second section.
Example :
# sec.name source community
com2sec local aa.bb.cc.dd/32 xxxxxx
Second section, map the security name into a group name
Example :
# groupName securityModel securityName
group MyROGroup v1 local
group MyROGroup v2c local
Third section, create a view for us to let the group have rights to
Example :
# name incl/excl subtree mask(optional)
view all included .1
Finally, grant the group read-only access to the systemview view
Example :
# group context sec.model sec.level prefix read write notif
access MyROGroup "" any noauth exact all none none
**** There is the easy way to configure snmpd.conf by you can copy from your existing server at path '/etc/snmp/snmpd.conf' and transfer to remote server that you're want to configure. ****
Start SNMP service :
After you configure snmpd.conf, you should start snmpd process by using command.
# /etc/init.d/snmpd start
Check process SNMP :
# ps -ef |grep snmpd
if there is no error, you should see the result like this
root 30240 1 2 15:40 ? 00:00:00 /usr/sbin/snmpd -Lsd -Lf /dev/null -p /var/run/snmpd.pid -a
Manage service snmpd to start every time when server's boot :
You can check if the snmpd service will be automatic start when the server boot by command.
# chkconfig –list snmpd
snmpd 0:off 1:off 2:off 3:off 4:off 5:off 6:off
That result mean the service snmpd will not start when the server reboot, if you want to start snmpd automatic you should use this command.
# chkconfig snmpd on
# chkconfig --list snmpd
snmpd 0:off 1:off 2:on 3:on 4:on 5:on 6:off
Test get information from snmpwalk:
You can test snmp service on server that you configure at monitoring server by command
/usr/bin/snmpwalk -c
if there is no error, you will see a lot of data like these.
RFC1213-MIB::sysDescr.0 = STRING: "Linux xxxx 2.6.9-78.ELsmp #1 SMP Wed Jul 9 15:46:26 EDT 2008 x86_64"
RFC1213-MIB::sysObjectID.0 = OID: NET-SNMP-TC::linux
RFC1213-MIB::sysUpTime.0 = Timeticks: (564217) 1:34:02.17
RFC1213-MIB::sysContact.0 = STRING: "Root
...
..
.
Troubleshoot when you cannot get the result:
if you see the error like this
ERROR: Description table : No response from remote host "x.x.x.x".
First of all, you should check IPTABLES on the remote host that there is a rule allow incoming package from monitoring server by port snmp ( 161 ) or not , by command
# iptables -L -v
if you cannot see the rule on your iptables, you should add this policy in you rule.
# iptables -I RH-Firewall-1-INPUT -s xxxx -p udp --dport snmp -j ACCEPT
the upper command will effective temporary until server reboot, if you want insert rule permanent you should run command
iptables-save > /etc/sysconfig/iptables ( or )
edit directly at /etc/sysconfig/iptables
If you still found the problem after you checked configure's iptables policy,
Please check the current mode of SELinux on that server , you can check the current mode of SELinux by command.
# sestatus
If you found the currrent mode of SELinux is 'Enforing', you must change the to the permissive mode by running command
# setenforce 0
then restart snmpd again.
Using PL/SQL Developer with Oracle instantclient
If you have PLSQL Developer installed on your computer already,
you have to download oracle instantclient from here
choose that supported for your platform & your database.
like, Instant Client for Microsoft Windows (32-bit)
==> Version 11.2.0.1.0
====> instantclient-basic-win32-11.2.0.1.0.zip
When you downloaded zip file to your computer already, extract to your path
like, c:\instantclient_11_2
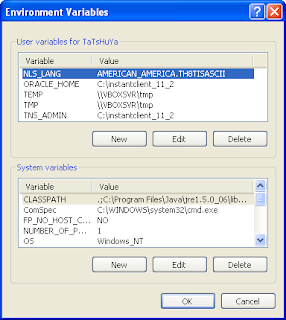
Then right client at My Computer ==> Advanced ==> Environment Variables
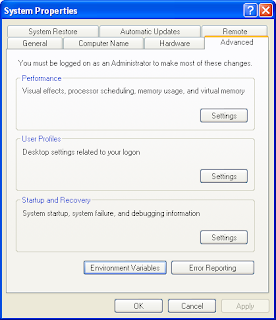
At Environment Variables window click new at user variable ( if you want to add for this user only) or system variable ( if you want all users on this computer use )
add
ORACLE_HOME=c:\instantclient_11_2
TNS_ADMIN=c:\instantclient_11_2
NLS_LANG=AMERICAN_AMERICA.TH8TISASCII
Then, Create text file tnsnames.ora at c:\instantclient_11_2 with your connection string to use your database
like,
TESTDB =
(DESCRIPTION =
you have to download oracle instantclient from here
choose that supported for your platform & your database.
like, Instant Client for Microsoft Windows (32-bit)
==> Version 11.2.0.1.0
====> instantclient-basic-win32-11.2.0.1.0.zip
When you downloaded zip file to your computer already, extract to your path
like, c:\instantclient_11_2
Then right client at My Computer ==> Advanced ==> Environment Variables

At Environment Variables window click new at user variable ( if you want to add for this user only) or system variable ( if you want all users on this computer use )
add
ORACLE_HOME=c:\instantclient_11_2
TNS_ADMIN=c:\instantclient_11_2
NLS_LANG=AMERICAN_AMERICA.TH8TISASCII

Then, Create text file tnsnames.ora at c:\instantclient_11_2 with your connection string to use your database
like,
TESTDB =
(DESCRIPTION =
(ADDRESS = (PROTOCOL = TCP)(HOST = 1.1.1.2)(PORT = 1521)) (CONNECT_DATA = (SERVER = DEDICATED) (SID = TESTDB)
)
)
That all!
==TaTsHuYa==
Subscribe to:
Posts (Atom)